Tuesday, February 28, 2017

Two for the price of one with the Happy Together Daily Diary Kit

Hello all!  Can you believe it's the last day of February?!  Today I bring you two layouts that I used with the Happy Together Daily Diary Kit (which by the way there are still 2 kits left!!) and the extra Pattern Paper.  I was trying to "kill my kit" and I feel like there is still quite a bit more.  Noel is amazing at packing in so much into each and every one of her kits.

This layout features my favorite ice cream that sadly is only available from the end of January to the first part of March every year.  It is from Baskin Robbins (where I work as a cake decorator) and I would say I definitely eat my fair share.  Good thing I can snag a few taster spoons every day to help me fill the craving ;).   The layout uses the pattern paper for the background papers and the rest of the journaling cards, chipboard stickers, title cards, small letter stickers, and washi tape are from the daily diary kit.


I started first by cutting hearts from the background paper and backed it with the strip pattern paper.


I then did some layering with my title by using two of the 4x6 cards and cut out the word love from both cards.  The large one I did hand stitching around the edges and the script I used a white pen and traced around the edges.   The long label helped house the rest of my title and the number stickers are from my stash.  


The finishing touch was placing the cute little arrow charms over the top of the chipboard hearts.  I used Helmar Scrapdots to keep them in place.  It is an adhesive that has to dry over night, but it keeps heavier embellishments  nice and secure.  

The second layout I played off the teal, green, black text prints in the pattern paper pack and 4x6/3x4 cards in the Daily Dairy kit.  

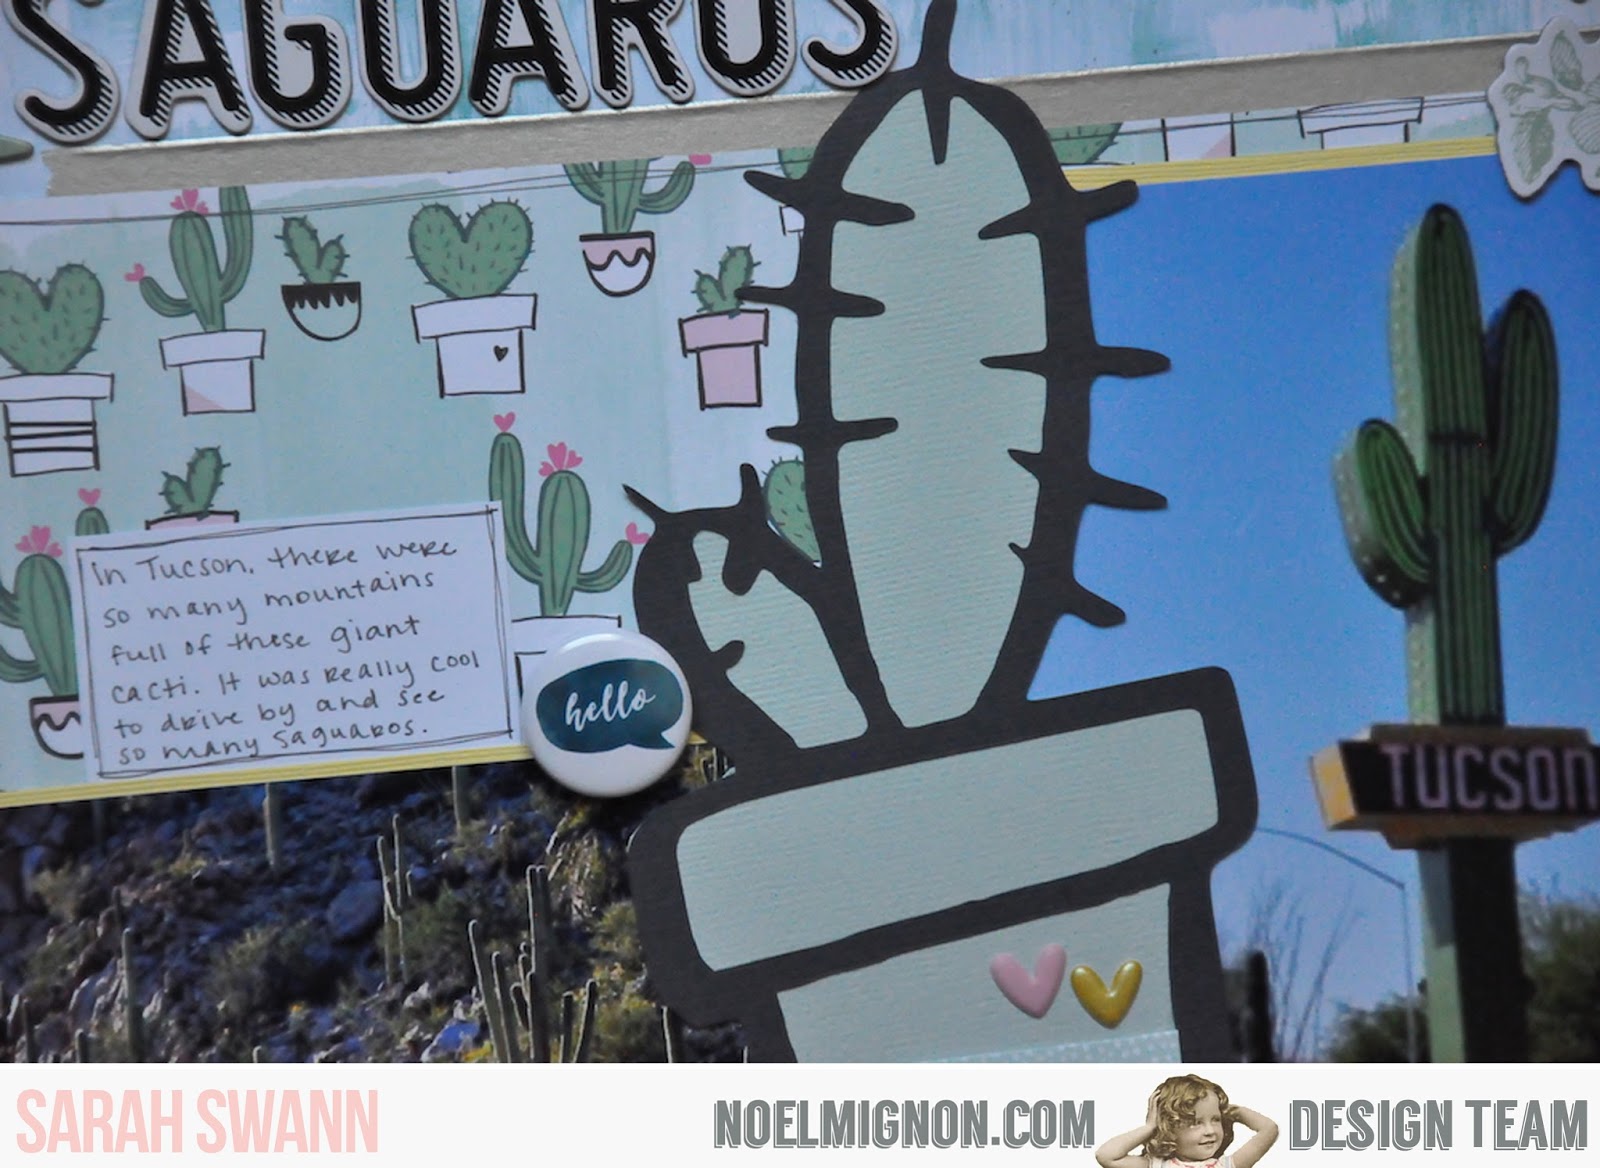
This layout features my husband.  These pictures were taken several years ago at our yearly family photoshoot and I have never done anything with them.  They are so him and so I thought it would be perfect to pair them with a little journaling about some of the things that often come out of his mouth.  Random phrases that are very much him.  

Basically all the cards/pattern paper, labels, stickers in the center part of the layout are all from the Daily Diary kit and the background cardstock and pattern paper are from the paper pack.  


I also added some extra color to my title with some enamel stickers from last months Little Bird Classic Kit.  


I loved this months Happy Together Daily Dairy kit and the addition of the pattern paper.  I was able to get three cards, three layouts, and the start of my nieces baby album from this months kit.  I'm hoping to get one more layout out of the extra pattern paper and if I do I will be sure to share it on the Noel Mignon Member Facebook page.  

Thanks so much for stopping by the blog today, happy scrapping! :)


Monday, February 27, 2017

{Valentine's Preparations} with the "Happy Together" Classic Kit

Hello all!  It's Meridy here today to share one last layout with the "Happy Together" Classic Kit.  I decided to scrap one more set of Valentine's pictures with this kit.

The bright colors in the papers in this kit really pulled in the colors from the photos I had of my kids creating their Valentine's cards for their classmates.


I started with the colorful background paper, and really wanted it to stand out on the layout, but it was a little too busy for my photos, so instead I decided to use it to mat my entire layout.  Next, I layered up a few other patterned papers and cardstock to build up my photos and make them stand out.  I wanted to use those cute banner stickers from the Pebbles sticker sheet, but they were not large enough to fit all of my journaling.  Instead I placed the banner stickers on the background, and built up some white strips of paper that were a little longer than the banner stickers and added my journaling to those.


I used both alphabets from the "Happy Together" Classic Kit to create my title.  I also added a few of the Pebbles stickers and puffy stickers to embellish my title a bit.  Finally, I outlined most of the layers and stickers with a thin black marker to make them really "pop".


Thank you so much for stopping by today!  I would love to see what you made with your "Happy Together" kits!


Saturday, February 25, 2017

The March Delightful Kits are here!!!


PAPERS:
5 American Crafts Cardstock: (Mint, Canary, White, Bubblegum, Waterfall)  Pebbles Tealightful (Delicate Lace, Meadow, Lanterns, Daydreams, Floral Patchwork), Crate Paper Chasing Dreams (Be Happy, Royale, Stay True, Whimsy, Collected), Pink Paislee Moonstruck(10, 12), Heidi Swapp Magnolia Jane (Southern Cottage, Miss Jane, Flea Market)
EMBELLISHMENTS:
1 package American Crafts "Maggie" Thickers, 1 Echo Park 6x6 Deco Dot stencil, 1 package Freckled Fawn puffy border stickers, 1 package (2 sheets) Maggie Holmes "Collect" foil chip stickers, 1 sheet Jillibean Soup Banana Yellow Alphabeans, 1 package Pretty Little Studio "Blooming Hearts" word stickers, 1 Prima "Wild and Free" clear stamp set, 1 package Pebbles puffy flowers stickers, 1 package Maggie Holmes vintage buttons, 1 package Maya Road resin mums, 2 Doodlebug mini doilies (yellow and blue), 1 roll assorted Maggie Holmes washi tape, 1 bottle Ranger gold liquid pearls, 2 Maggie Holmes paper butterflies, 6 Pebbles die cut shapes, 3 Freckled Fawn arrow clips, 3 Prima paper flowers, 2 Maya Road mint tassels,  3 Maya Road resin mason jars, 2 Pretty Little Studio flair buttons, 1 yard May Arts blue/cream ribbon, 1 yard May Arts crinkle pink tea stained satin ribbon.


1 12x12 sheet Maggie Holmes Chasing Dreams "Moment" paper, 1 12x12 sheet Echo Park "Flora" alphabet stickers, , 1 12x12 sheet Pebbles Tealightful "Tea Party" paper, (9) Crate Paper "Maggie Holmes Chasing Dreams" 6x6 papers, 1 package (3 sheets) Pebbles washi tape stickers, 1 package (8 cards) Pretty Little Studio "Blooming Hearts" 3x4 journaling cards, 1 package Freckled Fawn chipboard stickers, 1 package (3 sheets) Pebbles word stickers, 2 Doodlebug mini doilies (pink and yellow), (24) assorted (2x3 amd 3x4) Becky Higgins "Little Moments" journaling cards, 5 One Canoe Two "Hazelwood" cork shapes, 1 yard May Arts pink/cream ribbon, 6 Elle's Studio wood month tabs (months will vary), 2 Pretty Little Studio flair buttons, 9 Prima paper sheet music flowers, 6 Pretty Little Studio die cut shapes, 3 Maya Road number paper clips.


Friday, February 24, 2017

Saguaros - February Classic Kit: Happy Together

Hi!  Sarah here with my last layout using the February Classic kit called Happy Together.  Our challenge this week is to make a layout that is NOT "love themed."  For this one, that cactus paper really spoke to me.  Luckily, I used to live in Tucson, Arizona so I had some pictures of cacti that I hadn't documented yet.  This paper gave me that push to get those pictures scrapped!


I used two of the cardstocks from the kit and ran it through my Silhouette using a cut I got from a Facebook group a few months ago.  It's a cute cactus in a pot.  While these cacti in the picture are in nature, it still ties it all together and I really like it.


I used a mix of the two alphas included in the kit to create my title.  The horizontal picture is a mountain where there were a ton of saguaros.  Those were all over Tucson!


I used some of the Heidi Swapp chipboard to frame out the photos and some little embellishments to help highlight the Silhouette cut.  Also, that Illustrated Faith paper was fantastic with the little ink blots on them.  It reminds me of being in nature.


Finally, I used a piece of white cardstock for my journaling and used the washi tape from the kit to help shelf my title.  

I hope you enjoyed this layout and that you're using your February kit to create layouts that are not "love" themed.  Thanks so much for stopping by today!


Thursday, February 23, 2017

two more layouts to share

Hello again! 

For this week I have two layouts to share with you using the Happy Together Daily Diary kit. 

This kit has a very Valentines-y vibe but it can be used for every day pages as well, as you can see below. 

I LOVE this fun picture of my daughter, so much, in fact, because some people see her as a shy and quiet girl. From this picture you can tell that it isn't the case. Some people don't know her the way we do. 


I kept the page fairly simple with some pocket page cards and lots of hearts. I helped the page to pop a bit more by creating this fun page border with patterned paper strips and bits of washi tape of varying lengths and widths. I added some texture by stapling the pieces together. 


I love the bold colors of the kit- it's more than just reds and pinks. The yellow and blue give projects a fun pop. I added some cardstock sticker hearts, a chipboard heart and this black and white striped heart that I cut from a pocket page card. 

Here is a detail shot of my paper border:


For my second project I used paper strips again, but in a different way, layering pieces of the 6x6 papers under my photos. 


I added some bits of texture with the pretty pink adhesive lace, some twine, a metal heart clip and chipboard pieces. 


I created the title of my layout by cutting apart a pocket page card and couldn't resist adding some of those cute little hearts. I love the fun expressions on them!

I hope you've found some scrappy inspiration on the blog today. Come back tomorrow for even more!


Wednesday, February 22, 2017

Daddy Daughter Dance

Hello everyone, Michelle here! I just got back from a scrapbook retreat last weekend which was a much needed break. I feel like my creativity has been renewed and I'm ready to scrapbook everything! Good thing too, since we just had the new release last Sunday!!

My youngest daughter & husband went to a daddy daughter dance a couple weeks ago so I knew the Happy Together Classic Kit would be perfect to use for those photos.
That strip along the side with the stripes & flowers is actually cut from one of the other patterned papers that had 3 or 4 12" long images. I outlined the red alphas to make them pop a bit more from the background paper. And those chipboard alphas...I can't get enough of those! I seriously need more!!!

Tuesday, February 21, 2017

Baby album with Happy Together Daily Diary kit

Hey all! Nicole here to share my recent project with this months daily diary kit.  My little niece is fast approaching her first birthday.  As part of her birthday present I decided to put together a 6x8 album to record her birth and a few of her monthly highlights.  Yes, I'm sure she won't appreciate it now, but I hope it becomes something she treasures in years to come.

I started with the album cover.  I decided to use the paper flowers on the front, but knew they wouldn't hold up to a lot of use in their current state.  I used a foam brush to apply decoupage paste to the surface of three of the flowers.  


I placed them on a piece of plastic to dry.  


Once dry they were very stiff and I glued them along with some labels and a wood letter to the front of my album.  


Next I worked on the title page.  I used a piece of vellum and used washi tape along the top and bottom and chipboard stickers around my picture.  


The rest of the album I filled with cards, stickers, and pattern paper from the kit.  I left quite a few of the cards empty so my sister can write in journaling and thoughts for the photos.  


Several of the embellishments I glued right to the front of the page protectors.  


I'm pretty excited with how it's coming along so far and the kit is making this so fast.  I really like that this months kits can be used for so much more than Valentine's layouts/cards. 
I hope I was able to give you a little inspirations.  Thanks for stopping by the blog today and happy scrapping!


Monday, February 20, 2017

{Happy Girl} with the Happy Together Classic Kit

Hello Noel Mignon fans!  If you were at the March kit reveal party on Facebook last night, you know we are up for some beautiful creations coming your way with next month's kit...but for now, I'm still getting plenty of layouts out of my 'love-ly' February "Happy Together" Classic Kit!!!

This week the design team is going to use the February kit for layouts and projects that are NOT Valentine's related.  The Noel Mignon kits are so versatile, that you can use them for all sorts of topics and themes in your scrapbooking, cardmaking, and pocket pages.

I decided to make a page for my daughter's 9th birthday party this week.


I was able to use the "Happy Together" Classic Kit, although her party didn't have anything to do with Valentine's Day.  It took place in the middle of July, and was Parisian themed.  But the colors of the paper and embellishments matched my photos perfectly!

I really loved the different textures in this month's kit, I used chipboard, embroidered lace ribbon, and cardstock die cuts as embellishments on my layout.  I even added in a few self adhesive sequins from a previous Noel Mignon kit.


I embellished my title with another chipboard sticker, one of the CUTE glittered bows, a flair button,  and painted the wood veneer "Happy" pink to match the colors in the layout.  I used the black Thickers that came in this month's kit for my title and continued using the adhesive lace ribbon and sequins to keep the layout looking cohesive.


I finished off my layout with a piece of vellum for my journaling, pink stitching around the entire page, a paper ribbon with part of the branding strip on the upper right hand side of the layout, and a few light pink mist splatters.


Thank you so much for stopping by!  I would love to see what you are working on with your Noel Mignon kit over on our Member's Facebook Page, so please stop over and post your creations.  

Saturday, February 18, 2017

Bible Journaling Tags with Happy Together Daily Diary Kit

I've almost exhausted the contents of the Happy Together Daily Diary kit, BUT I had enough left to make a few cute tags with it! There is a wonderful world out there of Bible journaling, and I am all about it. It combines some of my very favorite things. 

Sometimes I don't like to add a lot of bulk to my actual Bible pages, so I thought it would be fun to make little bookmark tags. This way I can remove them when I'd like, but they still add a pop of color and whimsy. The extras from my kit were perfect for this! 


If you don't do Bible journaling, this would be great inside of any type of journal or book without permanently adding to the book itself. I hope you enjoyed my little idea! :)