Tuesday, January 31, 2012

Cabin Fever Pillow!


Happy Tuesday!! Lisa here today!

I love the fabric in the Cabin Fever kit. They both have such a beautiful pattern and are so soft.

I decided to make a little throw pillow so I could enjoy the softness. And the burlap!! Oh, I love burlap. I want to get burlap pillows for my couch, but for now this will do!

I have to tell you upfront I suck at measuring things. I just wing it so there are no dimensions on my instructions for the pillows. If you want to measure you can and still follow these steps below!

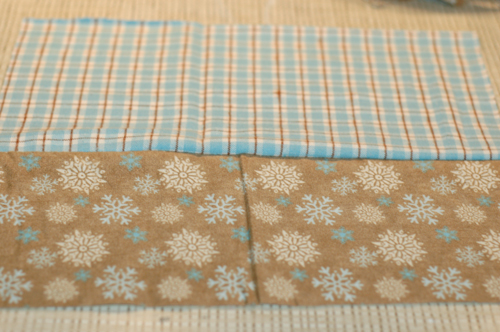
Make sure both pieces of your fabric are the same length. I left the blue one wider than the brown so there was more blue pattern since I left the back of the pillow all brown.

Put your fabric together so the outsides face each other. Then sew a 1/4" seam along the inside of the 2 pieces.


Then once your 2 pieces are stitched together you can open them up and you'll see the front of your pillow starting to take shape. You could iron the material at this point, but with this type of material I didn't worry about it since the wrinkles will settle on their own! 


Then cut a piece of the burlap (yum) to the same length of your two pieces and stitch it to the top of your pillow piece. I stitched right along the inside hem of the burlap on the top and the bottom. I used a neutral thread, but it would probably look really pretty with a contrasting color like red too!


Once your burlap is stitched on sew 5 of these beautiful buttons on to the burlap!


Ok, now this next step is very important. If you don't follow it exactly you might get all done sewing and find out you stitched it together inside out and have to take it all apart and start over...I'm just saying...it's not like I'd do that or anything ;) 

So now cut a piece of the material you want to use for your back that is the same size as your finished piece for the front.

Then (and this is the step you need to follow!) put your 2 pieces together so the pieces you want facing out on your pillow are facing each other on the inside. Basically it's like putting a shirt on inside out. This step allows you to hide the stitching and create your pillow!


Now stitch a 1/4" seam along all the edges leaving about a 5" opening on the bottom of the pillow. If you don't leave an opening you won't be able to turn your pillow right side our or stuff it! To get a nice corner make sure your needle is down when you turn your fabric 90 degrees.


Then turn your pillow right side out and it should look like this. You'll need to poke all the corners out.
 

Then stuff a generous amount of pillow stuff into your pillow, making sure you get the corners good!


Once all the stuff is hand stitch shut the open seam. This is why you want to keep the open section the bottom of your pillow. It's easier to hide the hand stitching that way!


Now display it some place proudly! I put it on the couch and when my husband came home he asked me where I bought it from...I was just happy he didn't instantly think I made it! 


My son quickly took it and thought it looked better on my bed! I have to agree!


Please let me know if my instructions aren't clear or anything!! 

Happy Tuesday!
Lisa

Monday, January 30, 2012

Inspiration Monday From Pinterest

Virginia was kind enough to pull some awesome inspiration from Pinterst for all of us this week. Here's what we're are thinking about this last week of January:


Hope these inspire you today! :D

Birdwatcher


I have lived in the same city my entire life, and while I have never made a hobby out of birdwatching, one spring I noticed that there was a type of bird in our yard that I had never seen in the 33 years I have lived here. My family and I became fascinated with the Western Tanager birds and had a great time observing them. It has been two years since that Spring and we haven't seen that type of bird again. I'm so glad I snapped a few shots of them to scrapbook.


I used the Noel Mignon Mary Ellen kit (still a few left in the shop HERE) to create this page. This kit is so playful and fun with it's bright colors. I had a great time selecting patterned papers for this page and decided to use a blocked background for my photos so that I could feature several of the papers together.


The pops of red and yellow against the soft aqua, pink, and brown, really adds a lot of energy to this page.

Have a great week!

Jana Eubank

Friday, January 27, 2012

How Charming


The Charm School kit went up for sale this week, and I couldn't wait to whip up a layout with it!

It's such a versatile kit... I meant, who doesn't mix in a little love with all their layouts?!

I used this great shot I caught over the holidays: 
I'm in LOVE with the fun little October Afternoon flags & pennants in the kit! 

That tab stamp is pretty dang awesome too. It's so fun! 


Have you grabbed yours yet? Go run and get it


Wednesday, January 25, 2012

A couple things to share...

Good morning good people!
*****
I have a couple fun things to share with you today.

First up, here is my first layout with the all new Charm School kit!


This is a great kit!
Of course I am a sucker for hearts and just about all things red so I love this kit!
BUT it is not so theme-y that it can't be used for things not so lovey-dovey!
You can check out the kit and everything in it (here).
Get yours while you can!!
*****
OK here is another layout for ya!
I made this one as part of the winter layout tag game we did here at Noel Mignon.
{Sign ups for the newest tag game are going on now! Check out this thread on the message board.}

I used the Bees Knees kit to make this layout.
But I did steal the alphas from the Study Hall kit to make the title!

OK that's all I've got!
Have a great day!!
*****
P.S.
Did you see that Noel is going to start offering subscriptions??!
You can save money on kits, get a lower free shipping minimum, and have your kits shipped first!
More details are coming but check out this thread to learn more!
:)

Tuesday, January 24, 2012

Family Time with Cabin Fever...


Hey there, this is Lisa today! Happy Tuesday!

One of my resolutions/goals this year is to have more quality family time. The coziness of the Cabin Fever kit was perfect for putting together a layout to document this resolution.


I created a quilt like background to add to the cozy family feel. I cut out some 1"x1" squares and just put them in a diagonal patterns. I love the addition of the burlap! I used the fabrip on the seams of the layout and bunched them up and stuck a cute Maya Road pin through it!


Happy Tuesday! 
- Lisa

Monday, January 23, 2012

Charm School Kit

Make your own slideshow at Animoto.


Charm School Includes
Papers
Cardstock
-Pink
-Cream
-Waterfall
-Raspberry
-Sunflower
My Minds Eye "Love Me" (Double Sided)
-Die Cut Accessory Sheet
-Banners
-Numbers Grid
-Hearts
-Doilies
-Stamped
Hambly Screen Prints
-Lattice
October Afternoon "Sidewalks" (Double Sided)
-Hide and Seek
-Kick the Can
Pebbles "With Love" (Double Sided)
-XOXO (Embossed)
-Sweetheart
-Dear Valentine
Crate Paper "Paper Heart" (Double Sided)
-Cupid
-Friendship
-Valentine
-Define
We R Memory Keepers "Love Struck" (Double Sided)
-Cutie Pie
-Love Blossoms
-Kiss Me (Die Cut)
Embellishments
-1 Sheet Crate Paper "Paper Heart" Border Stickers
-1 Sheet Crate Paper "Paper Heart" Phrase Stickers
-1 package American Crafts "Wonder" Thickers
-1 Sheet October Afternoon Teal & Cream Mini Market Sticker
-1 Sheet Hambly "Pink Banners" Rub Ons
-33 Melissa Frances Rhinestones
-1 We R Memory Keepers "Love Struck" Acrylic Stamp
-3 American Crafts Paper Heart Embellishments
-1 Package We R Memory Keepers Gumdrop Brads
-1 Package October Afternoon "Sidewalks" Wrap Pack (3 trims)
-1 Package My Minds Eye "Fun Day" Buttons
-3 Maya Road Canvas Butterflies
-3 We R Memory Keepers "Love Struck" Bottle caps
-1 Package October Afternoon "Sidewalks" Little Flyers
-1 American Crafts "Candy Shop" Pink Gel Pen
-1 American Crafts "Candy Shop" Black Gel Pen
-2 Pebbles Kraft Scalloped Mini Envelopes
-1 fabric swatch
-6 Maya Road Pins
-1 Elle's Studio Lil' Snippets "Adore"
-1 Elle's Studio True Love Pennants
-3 Elle's Studio small tags
-1 We R Memory Keepers "Love" Embossed Tag
-1 Bunch Melissa Frances Pink Mini Florals
-1 Bunch Melissa Frances White Mini Florals
CLICK HERE to order!


And here is Virginia's video showing off the contents.

Sunday, January 22, 2012

Charm School Up Tomorrow

The February kit is ready to go and will be up for sale bright and early tomorrow morning! If you would like to see more sneaks then head over to the Message Board, or Facebook to see close ups! Hope you like what you see...this is a cute/fun one!

Friday, January 20, 2012

Being challenged


We have a new series of challenges on the message board we are doing- a "Would you rather..." sort of challenges. The object is to make a choice and implement it on your layout! 

Here's the first set of choices:

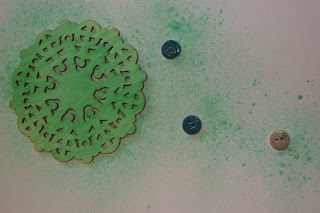
I chose mist, and grabbed that great mist out of the Cabin Fever kit, a couple of buttons, and the wooden doily. 


Spritzed.


Results! I love the easy way to do some random polka dots! You can do them with all sorts of different sized buttons, different patterns... so fun! 


 The second set of choices: 


I decided to really challenge myself and do the sewing machine, since it's something I love the look of but rarely take the time to do on my own projects. 


I'm so glad I did! I moved my sewing machine to a more easily accessible place so now I can use it more often. I really love it! 


Come check out our message board challenges and join in! They start on the 15th of every month and you have a whole month to participate. :) 

Wednesday, January 18, 2012

Try this!

Hi!
And happy hump day to ya!!
I have something fun for you to try today!

A couple of weeks ago I made a few cards for the Bella Blvd blog.
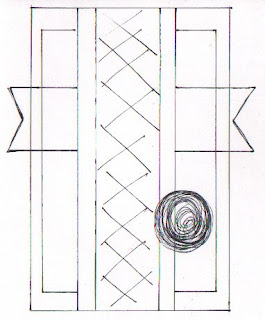
After being stuck in a little rut, I ended up coming up with an easy sketch to help me make the cards.

Here is the sketch I drew out...


And here is one of the cards I made from the sketch...

The more I looked at the sketch, the more I thought it might work for a layout too.

So I tried it!

I grabbed Noel's Cabin Fever kit and went to work!
Here is the resulting layout...

I like it!
I think the sketch can work for cards and layouts!
Now you try it!
See if you can use that sketch to make a card or make a layout...either one!
Just go make something!!
*****
Have a great day!!
gretchen

Tuesday, January 17, 2012

Cabin Fever Cards


Hey everyone, this is Lisa today! Happy Tuesday!
I made some cute everyday kind of cards with the Cabin Fever kit. I've challenged myself this year to make a set of cards out of every kit. I'm really bad about actually sending out cards because I don't have them on hand. So many times I want to write a quick thank you or something, but I don't because I don't have the right card. This is my solution!


I love the colors of these cards. I especially love that while most of my cards tend to be more girly that this can work for both...because yes, sometimes men need to get a card too!!


I used the Jenni Bowlin stamp that is in the kit to have a quick spot to add a sentiment inside the card. 


Easy peasy! Now I have 4 cards fresh in my growing stash to send a quick note!

I hope your week is off to a good start!