Tuesday, September 30, 2008

Homeroom Notepad!

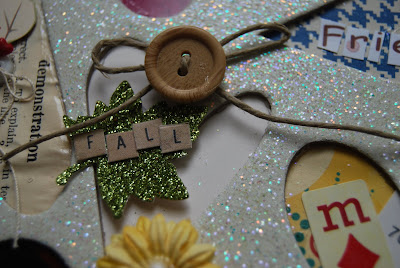
This was a notepad I altered for my student teacher. It was purchased at the dollar store. I wish I had taken a picture of it "before!" (It was pretty ugly!) I covered the base of the clipboard with October Afternoon paper from Noel's Homeroom Kit. (Currently sold out!) I used a spray adhesive to adhere it. I did the same thing to the notepad. I sanded the edges to distress it and blend it in. I used the black ribbon to create a holder for the pen. I used the same ribbon to create a border at the top. I then added a Making Memories glittered leaf. I threaded a button with twine, and adhered it to a vintage book paper star. With a JustRite stamp I added my student teacher's name. At the end of her student teaching experience I will add this to her gift basket!

Monday, September 29, 2008

It's All About the Daubers!

Yes, I said daubers! You know those funny little things to add color to the edges of things? First, I'd like to share an organizational tip with you. I use daubers with many different colors and had a difficult time knowing which dauber went with which color ink. So many of the blues look similar. So with my Cropidile and some jewelry tags, I marked which color was used.
Thread the jewelry tag through the hole and Voila! You now know which color goes with each dauber!


How about using those daubers with a mask? I used a Tim Holtz spider web mask found in Noel's Ghost Story kit.

When you peel the mask off, it looks like this!


Stick the mask on the paper of your choice. I used a patterned paper by Making Memories, also found in Noel's Ghost Story kit.


I used Going Gray for this.....

With inked up dauber spread, dab ink around the mask.


Peel off the mask and this is what you have! Cool huh?

This is what I created!


One more suggestion on using those daubers. Use them to make clouds! I bought this stencil eons ago and use it a lot! You could create your own using heavy card stock or tag board. Just lay the cloud template and dauber white ink around the edges.


This is a sample of the effect you would get! Experiment a bit with this to get the look you want! Who knew daubers could be so fun?!


Saturday, September 27, 2008

Blue Skies, Ghost Story, Aw Yahh!

Here's some stuff I have been working on over the last week. this first LO was done with the Blue Skies kit. I also added some of the small MM letters and the new Dolce AC Thickers (LOVE these!!).


This is done almost entirely with the Ghost Story kit. The only thing I added was the small piece of SR chipboard from the Salem kit.


And this is my entry for the Reduce Reuse, Recycle challenge. I used a large (14x14) piece of packing cardboard. The paper is from the Extra Credit and homeroom kits. I also added some ink and paint on the base and some red Thickers, as well as the rescued piece of Hot Wheels packaging. The "Aw Yahh!" title comes from my husbands personalized plate. That car is his baby. TFL!!!

Friday, September 26, 2008

Ghost Story Projects

Here is a closer look at the projects I have been creating with the Ghost Story Kit (only 4 left!!!)
Have a great weekend! ;)

Boo by Jana Eubank

Halloween Knight by Jana Eubank


Our Lil Punkin by Jana Eubank


Eek! Card by Jana Eubank


Thursday, September 25, 2008

A little Blue Sky for you

Well I got my Blue Skies kit and I was beyond excited to jump in and play with it ---- but it seems as if you all were just as anxious! Seeing as all are SOLD out!! That is awesome! So I will be posting some of the things I have done with the kit. And remember I have just begun :)

This kit really screams fall to me - but with a wonderful shade of blue that yes, reminds me of the sky. I actually found pictures that were not taken this or last fall but in the summer. Alyson is playing in the fountain that we seem to always get a picture of at least once during the summer. I think the paper worked perfectly.


And this one is not from the Blue Skies kit - but from the Extra Credit kit - I made this for the Reduce, Reuse, and Recycle challenge. I used some of the corrugated cardboard that the kit came in. And for the stars I used an empty package from some embellishments I had and used a star shaped punch. Easy Peasy!


I hope you enjoyed these!

Michelle

The Weathered Metal Look

I developed this technique a few years ago as a design team member of FiberScraps.After using their inks in all ways possible, I started to run out of ideas of how to use them in new ways. Just experimenting one day, I came up with the idea to use it as an additional step in embossing. I loved the old-weathered metal effect it created when the ink was applied to the embossing. In this tutorial, I used gold powder, but experiment with silver and copper. They all look really neat!


To get started you will need:

  • Heat Embossing Gun

  • Versa Mark Watermark Stamp

  • Chipboard (any piece)

  • Embossing Powder (any metallic color)

  • Walnut Ink (Any non-spray kind will work, I prefer Fiber Scraps Tintz)


    • 1.) Select your chipboard piece and firmly press into the watermark stamp, creating a nice sticky side to adhere the embossing powder.


      2.) Pour a good amount of embossing powder over the chipboard and gently remove from powder.


      3.) Using your heat embossing gun, start heating up the embossing powder. Just when the powder starts melting onto the chipboard, remove the heat.4.) Using the walnut ink, dab the ink onto the chipboard piece creating little drops of ink around the piece.
      5.) Using your heat gun, begin applying more heat to the chipboard piece. Heat until the drops of ink begin to "burn" into the chipboard. (Make sure you are in a well-ventilated area, as this tends to create a burned smell temporarily) 6.) Apply heat until you are satisfied with the look and texture of your piece. Allow to cool and use on any project! As you can see here, I used this technique on 2 pieces of chipboard from the Memory Lane kit to adorn my page titled, "Sing"

      Wednesday, September 24, 2008

      Some lovelies for you!

      I've got some lovelies to share with you this morning out of the gorgeous Homeroom kit. I always say that Noel's kits are the kits that keep on givin'... and it's true. I have soooooooooooooooooo much left with this kit.

      I like to add up what I've made with a kit so far, and with this one, I've already made a Welcome sign, three layouts, two folders, a mini tote bag, and the frame magnet I'm about to show you. And there's still more to come! ;)


      I wanted to show y'all how I layered several rubons behind the title.... even though they don't necessarily "relate" to the layout (they are rulers and the alphabet), they still make a great neutral background and add some dimension behind the letters.
      I love to layer, and here's a close up of some of the details in the journaling & embellishments.
      Here's my contribution to the Reduce, Reuse, Recycle challenge. I used Heidi Swapp embellishment packaging to make a frame magnet for my fridge!

      You can find a tutorial for this tote bag here.

      Tuesday, September 23, 2008

      Ghost Story and other news

      Hey guys! So I still can't get over how fast the Blue Skies kit sold out! Literally just a few hours and it was gone. But I do have a couple of Ghost Story kits left! So get on over to the store and order yours before midnight tonight (Tuesday the 23rd) to get your mystery gift! Remember, items include grungeboard sheets, ribbon, paper, stickles, stamps and more!

      CLICK HERE TO ORDER!!!

      Also, if you would like a chance to win a kit The Design Experiment is giving the PB add on kit away to the winner of their current challenge. So hop on over there and get in on that!

      Recycle!

      Tessa Ann decided to challenge the design team into using packaging for a LO or project. I happened to have the negative image of hearts by Melissa Frances. It sat there calling to me....so I answered that call with this LO! I decided to do a collage style LO with all of the things I love. I included clothing tags, my dairy creamer for my coffee, and a Yankee Candle packaging. I stamped on this LO, used pictures, and a little bit of everything else! The paper was from Noel's Homeroom Kit. (Currently sold out, but there are a few Extra Credit kits left!)
      See that polka dot strip? That was from a Heidi Swapp package as well as the tab by my title that says, Today. Told ya I went "green!" It was a bit out of my comfort zone to create, but a whole lot of fun! Thanks Tessa Ann for a great challenge! ( I will never throw ANYTHING away now..........thanks......*sigh*)